Reporting
HubSpot Reports – All You Need to Know
HubSpot’s Reporting feature gives you valuable insights into your website’s traffic, leads, and customers. With this data, you can make informed...
Enhance lead generation with HubSpot Forms - a comprehensive guide on using forms to capture, manage, and nurture leads effectively on your website.
Forms stand as a cornerstone in any marketer's arsenal, serving as the go-to method for capturing crucial lead details. Every interaction, from website pages to campaigns and social media ads, eventually guides prospects to share their information through a form.
The ultimate aim is to make the process as smooth as possible and to pose the right questions at opportune moments to capture more qualfied leads. Lets take a look at how to utilise the HubSpot form tool to boost lead generation for your business. HubSpot form are designed not only to capture leads - they help nurture into valuable customers through the integration of HubSpot's forms tool with the broader HubSpot platform ensures a streamlined experience in tracking and managing your leads.
This blog post delves into the workings of HubSpot forms and their pivotal role in amplifying lead generation. Let's get started.
What are HubSpot Forms
HubSpot forms are part of the HubSpot marketing platform, allowing businesses to create standalone and embed forms on their website or landing pages. These forms are designed to capture lead qualification information from website visitors, such as their name, email address, job title, company, and other relevant details.
The forms are customisable, allowing businesses to tailor the forms to their specific needs and requirements usingse HubSpot's drag-and-drop form builder to create forms quickly and easily, without requiring any coding or technical skills. You can choose from a comprehensive range of form fields such as text fields, number fields, dropdown menus, checkboxes and more,
HubSpot Forms information captured is automatically synced within HubSpot CRM. This means that businesses can easily manage and organise their leads and contacts in one central location and combine with the power of forms with Hubspots marketing tools
HubSpot Forms also offer a range of features to help businesses optimise their lead generation efforts. For example, businesses can set up lead nurturing workflows that automatically send follow-up emails to form submissions. They can also set up progressive profiling, which shows different form fields to returning visitors based on the information already collected.
With their customisable options, integration with HubSpot's CRM system, and lead optimisation features, HubSpot Forms make it easy for businesses to generate, manage, and nurture leads from their website visitors.
Benefits of HubSpot Forms
Easy to use:
HubSpot Forms is easy to use and does not require any coding or technical skills. You can create and customise your forms without any technical expertise.
Customisation:
HubSpot Forms allows you to customise your forms to match your brand and website. You can choose the design, layout, and fields that best suit your needs.
Analytics:
HubSpot Forms have their own analytics allowing you to learn about the performance of each form such as the the number of views, conversions and more.
Integration:
HubSpot Forms integrate with the rest of the HubSpot platform, making it easy to track and manage your leads as well as collaborate with sales and support.
Lead generation:
HubSpot Forms are an effective way to generate leads. By offering valuable content or incentives, such as eBooks or free trials, in exchange for contact information, you can capture more leads for your business. They make it easy to capture lead information. This means that you won't have to worry about losing leads because they didn't fill out a form.
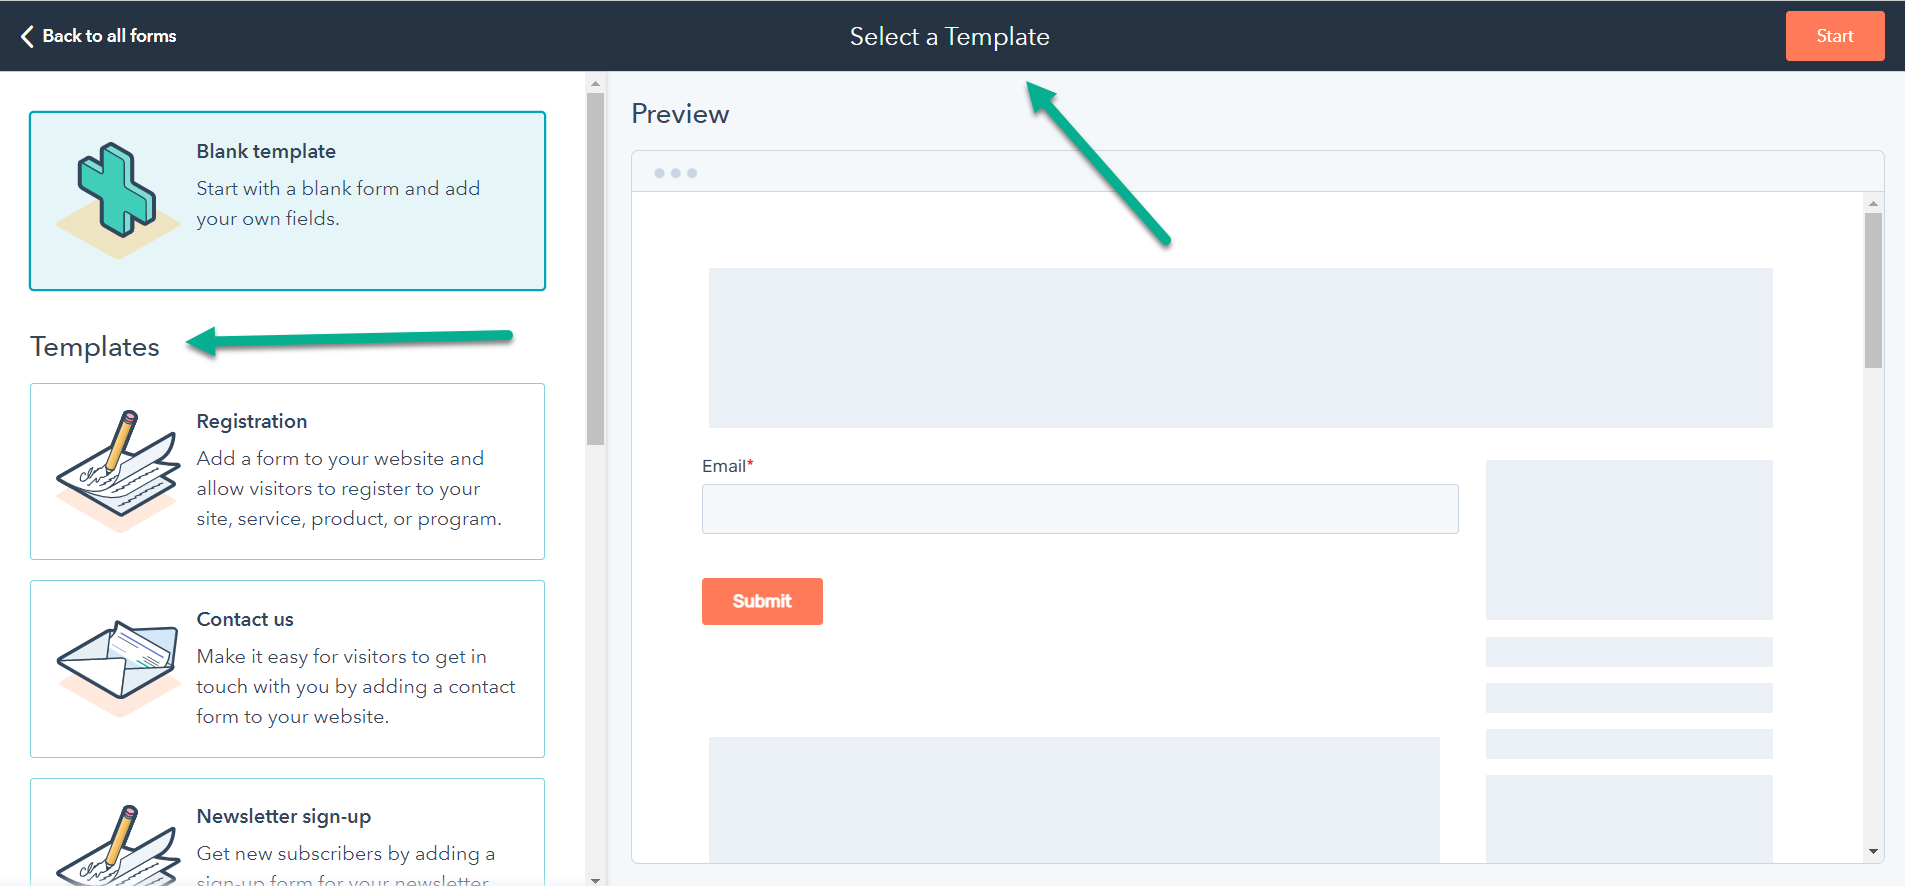
HubSpot provides a range of form types, each designed for specific purposes, enabling businesses to effectively capture leads and gather information from potential customers. To this end, HubSpot provides a variety of pre-built form templates that you can use to get started quickly. These pre-designed templates are crafted to aid you in identifying and selecting the essential fields suitable for various types of forms. To get started, simply select the template that best fits your needs, then customise it to match your brand. Once you're happy with your form, you can add it to a landing page or embed it on your website..
The convenience of opting for any of these templates cannot be overstated, providing an exceptional foundation for initiating the form creation process.
However, for a more tailored and personalised approach, in this illustrative example, we will embark on the form creation journey by deliberately choosing the Blank template.
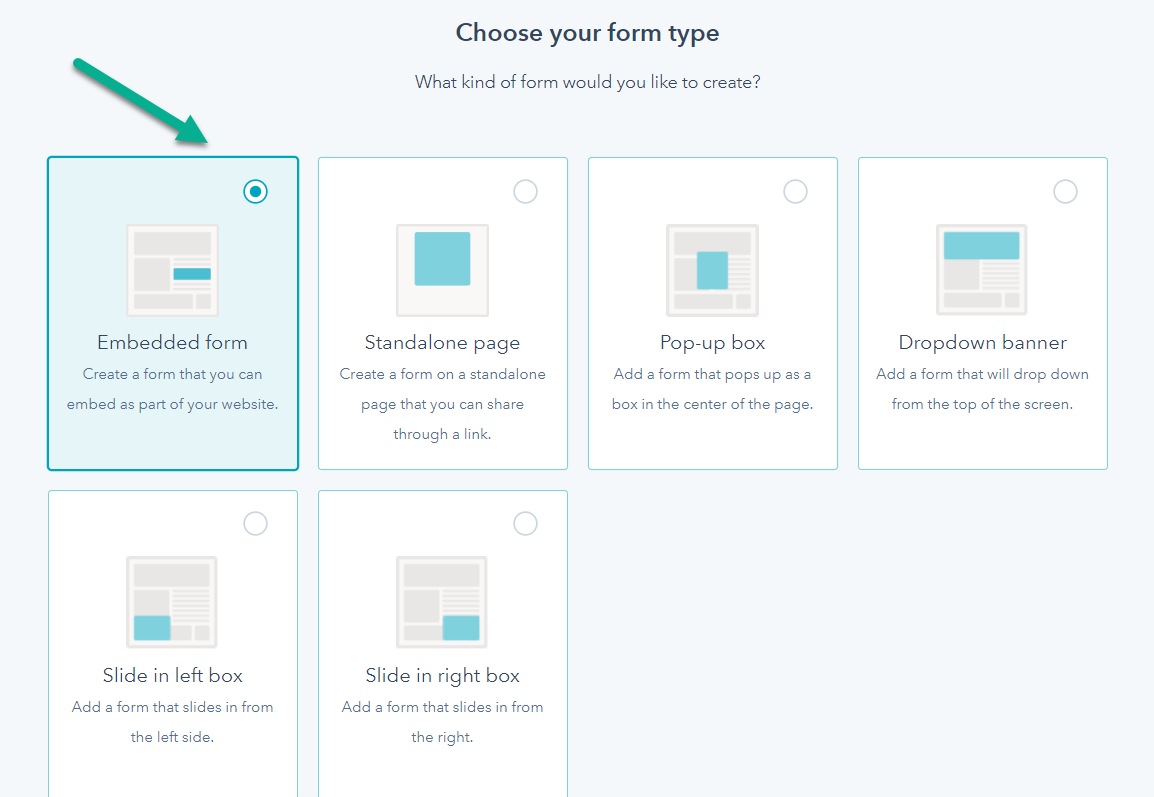
The available form types and their functionalities are detailed below:
Embedded Form:
Standalone Page Form:
Pop-Up Box Form:
Pop-up forms can be triggered by various conditions, such as a visitor scrolling to a specific point or clicking a designated button. This targeted approach ensures optimal lead capture at key moments, ultimately improving lead conversion rates.
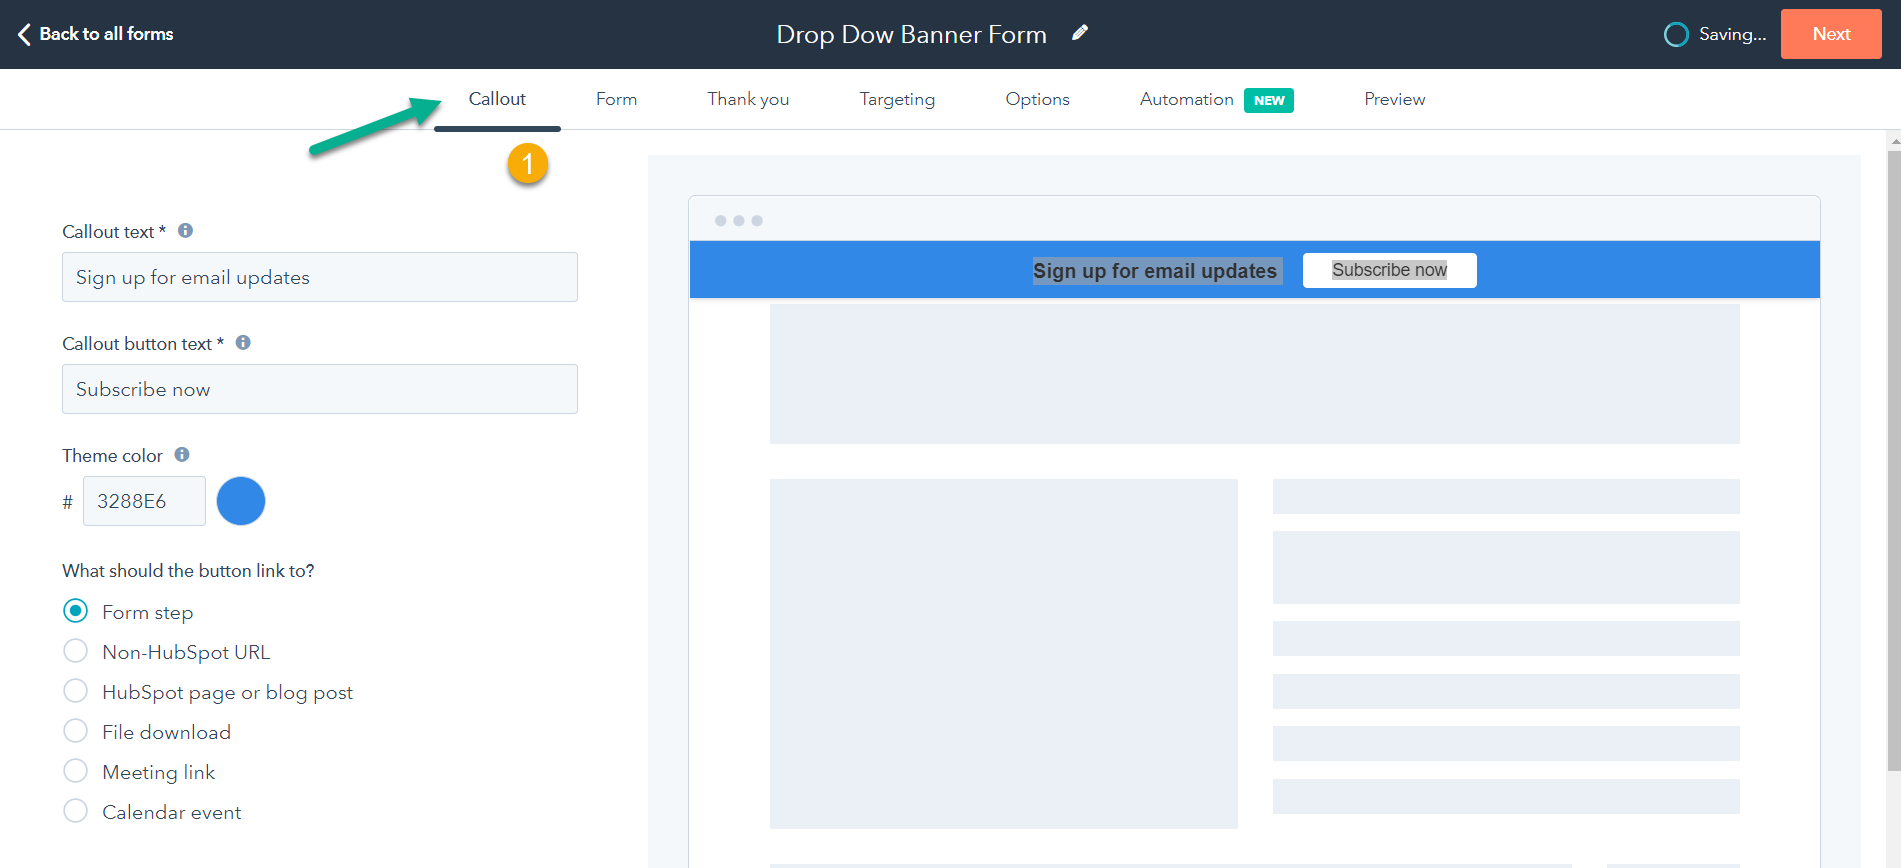
Dropdown Banner Form:
Slide-In Left Box Form:
Slide-In Right Box Form:
These diverse HubSpot form types offer businesses flexibility in their lead generation strategies, allowing for a tailored approach based on the specific needs and preferences of their target audience.
Dependent & Progressive Fields
While online users are accustomed to filling out forms, their engagement can be hindered if the forms have too many required fields causing drop-offs. Marketers are often measured by the quantity of completed form completions - but more fields help ensure the collected leads (contacts) are qualified. Getting the right mix is difficult, and that is where depedent and progressive fields can help marketers do just that.
HubSpot forms offer three essential features to enhance conversions:
Using Dependent Fields:
Implementing dependent fields allows you to ask more questions based on user choice without elongating the form.
For example, add and initial field to the form, such as Country/Region. Then click on the field, access the Logic tab, and navigate to dependent fields. Next design the logic, such as showing the State/Region field only if the country selected is the United States. This ensures that the State/Region field remains hidden for visitors who don't choose the United States which keeps the form relevant and user friendly.
Progressive Forms Feature:
Progressive forms dynamically adjust the displayed fields for returning visitors, allowing you to gather more relevant information over time without asking the same questions again. Think of it as a dating analogy; you don't ask the same basic questions on every date. To set up progressive fields: Return to the view with existing properties on the top left-hand side. Identify questions for returning visitors, drag and drop them into the Queued Progressive Fields section on the right. Note that these progressive fields are shown only to returning visitors in your CRM database. New visitors see the default form fields like First Name, Last Name, Email, and Country.
Collecting Business Emails:
To encourage users to provide business email addresses, you can block the inclusion of free email addresses. Click on the Email field in the right-hand section, and a pop-up box on the left will appear. Scroll down to the Email domains to block section, where you can add specific domains or check the Block free email providers box.
By leveraging these HubSpot features, you can enhance the user experience, reduce form abandonment, and gather more insightful information from your contacts.
With your forms optimised, the next step is to deter spam submissions, thwart bots, and ensure compliance with data privacy regulations such as GDPR and the California Consumer Privacy Act (CCPA). Adhering to these regulations not only safeguards your contacts' information but also shields you from potential fines and penalties in the future.
To implement these protective features, follow these steps:
Set up reCAPTCHA:
Add GDPR Notices to Your Forms:
Incorporating these features into your forms not only strengthens security but also contributes to attracting higher-quality leads. Nurturing these contacts before engaging in direct communication can significantly impact the overall effectiveness of your lead generation efforts.
Forms offers a variety of options that allow you to customise the appearance and behaviour of your forms.
Here are some of the options available:
Design:
You can choose from a range of design templates or create a custom design for your form. You can also customise the layout and style of your form, including the font, colour scheme, and background.
Fields:
You can choose which fields to include on your form and customise their labels and placeholder text. You can also specify whether a field is required or optional.
Behaviour:
You can specify how your form behaves after it is submitted, such as whether to show a thank you page or an inline message, or redirect the visitor to a different page. You can also choose whether to send a confirmation email to the visitor after the form is submitted.
Targeting:
You can use the Form Targeting feature to customise the appearance and behaviour of your forms based on the visitor's location, device, and other characteristics.
Integration:
You can integrate your forms with other tools, such as email marketing platforms or CRM systems, to automate your lead management process.
By using these options, you can customise your HubSpot Forms to meet the specific needs of your business and improve the effectiveness of your forms.
Targeting lets you decide which form to show and where it should show on your website.
Targeting allows you to customise the behaviour of your forms based on the visitor's location, device, and other characteristics.
This provides a more personalised and relevant experience for your visitors and increasing the effectiveness of your forms.
When building the form, you select the targeting conditions for this specific form. For example, you can choose to show this form only to visitors from a specific location, using a specific device, or who visit a certain page on your website.
Overall, the HubSpot Form Targeting feature is a useful tool for providing a more personalised and relevant experience for your visitors and increasing the effectiveness of your forms.
The next step is to ensure there is a confirmation process for contacts once they've submitted a message. HubSpot forms simplify this by offering an option to create a follow-up email within the form itself. To access this feature, click on "Follow-up" on the top navigation bar in the form module, as depicted in the following screenshot:
Upon reaching this section, click on "Create follow-up email" to commence the email creation process. It's worth noting that for this particular webinar form, creating a follow-up email may not be necessary, as the email will automatically be generated from the platform hosting the webinar, such as Zoom or Google Meet.
A follow-up email is generated, as depicted in the subsequent screenshot. However, bear in mind certain limitations when creating this email. Features such as personalisation tokens are not accessible in this basic form email template, and the ability to edit the footer address to a single line or two is not possible. If these features are crucial for your follow-up email, it is recommended to build a regular automated email and then integrate it into the workflow.
Once a follow-up email is crafted, the subsequent option is to define the subsequent actions when a user submits the form, identify who should be notified, and determine whether these contacts should be categorised as marketing contacts and added as new entries in your CRM.
After a user submits a form, you need to let them know their enquiry has been recieved succesfully.
In HubSpot, you have the flexibility to choose between a thank-you page and an inline message as the confirmation.
Thank You Page: A separate page is displayed after form submission by redirecting the website visitor.
Inline Message: Appears on the same page as the form after submission.
To implement either action in HubSpot:
Click on "Options" on the top navigation bar of the form.
In the first section, choose whether to display a thank-you message or redirect users to another page.
For a thank-you message: Click on the option and create the desired message that the person who completed the forms sees.
For redirecting to another page: Enable the "Redirect to another page" option. You can also include other marketing collatoral on this dedicated thank you page for nuturing the lead. We recommend redirecting rather than using an inline thank you page as this is easier for other marketing efforts such as tracking leads in Google Analytics, Google Ads, Facebook Ads etc, etc.
Another important configuration is determining who in your company receives notifications upon form submission.
By default, the form creator is notified, but this may not align with your specific needs. For instance, in a demo form, you'd likely want the lead owner to be notified. To set up notifications:
These configurations ensure a seamless post-submission experience and efficient communication within your team.
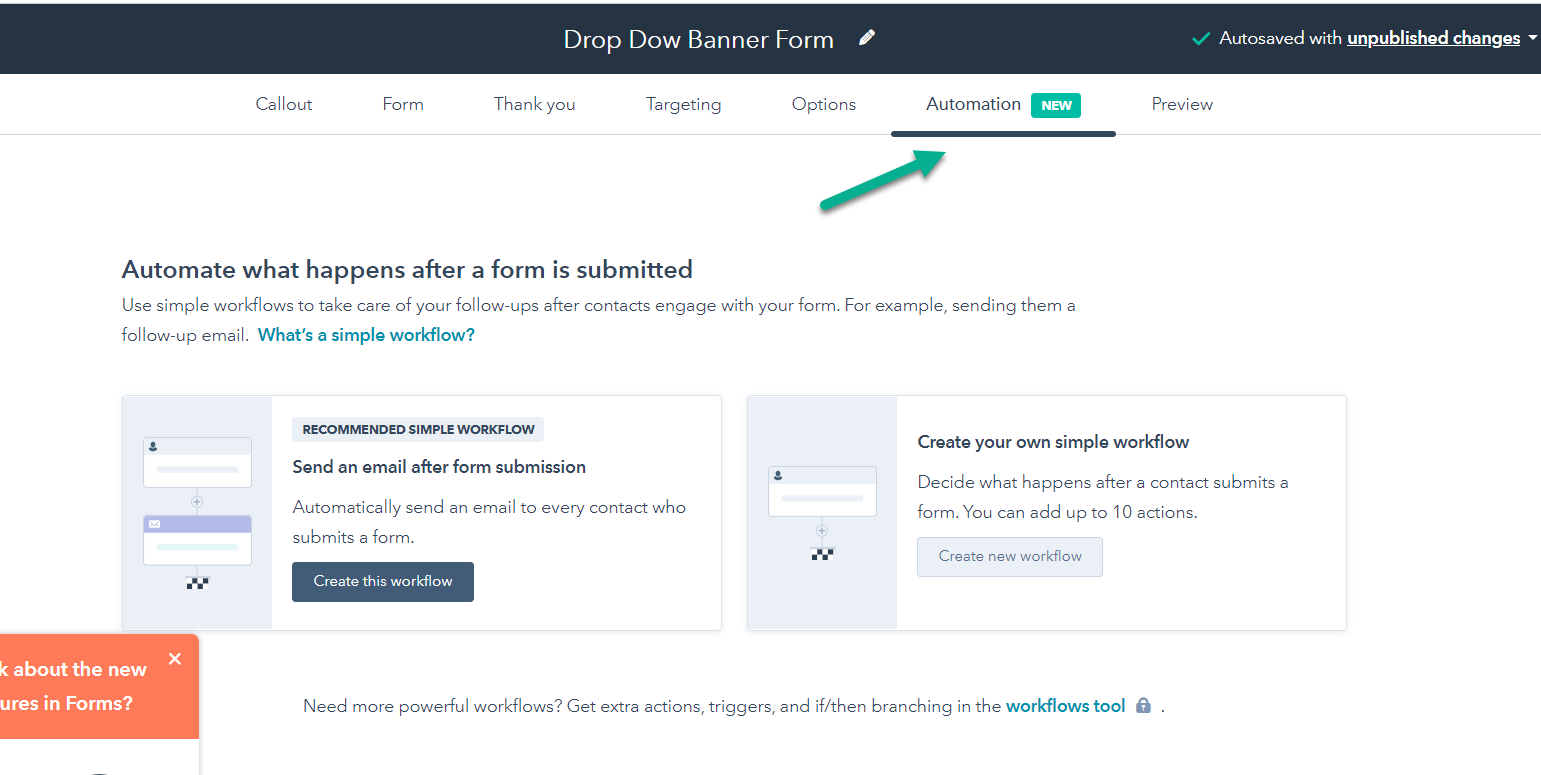
HubSpot form automation is a feature that allows you to automate actions based on the submission of a form. This can be useful for streamlining your lead management process and saving time.
To use the form automation feature, you specify the automation actions you want to take when the form is submitted. For example, you can choose to send a confirmation email to the visitor or add them to a specific email list using the forms in-built simple automation. A simple workflow is a basic set of automated actions that are triggered based on the submission of a form.
To create a simple workflow in a form, you will need to create a form and then specify the actions you want to take when the form is submitted. For example, you might want to send a confirmation email to the visitor, add them to a specific list in HubSpot, or update their record in your CRM system.
You can also use form automation to trigger more advanced actions based on the submission of a form. For example, you can enroll them in a sequence or start a HubSpot workflow based on the visitor's form submission. HubSpot Workflows allow you to automate tasks and streamline your lead management process.
To create a workflow in HubSpot Forms:
By creating simple workflows in HubSpot Forms, you can automate tasks and streamline your lead management process.
Overall, the form automation feature is a useful tool for completing actions based on form submissions and streamlining your lead management process.
How to Create HubSpot Forms
Now that we've looked at the benefits of using HubSpot forms, let's take a look at how to use them.
Select Create Form:
First, create a form using the HubSpot forms tool. Choose a design and layout that is optimised for conversion and reflects your brand. To create a HubSpot form, log in to your HubSpot account and go to Sales > Forms. Then, click the Create Form button.
Select a template:
Next, you'll need to select a template for your form. HubSpot offers a variety of templates that you can use, or you can create a custom form.
Customise your form:
Once you've selected a template, you can customise your form to match your brand. Select the fields you want to include on your form. These might include name, email, phone number, and any other information you want to collect from your leads.
Add a call to action:
Add a call-to-action (CTA) button to your form, such as "Sign Up" or "Download Now." This will encourage your visitors to take the next step and submit their information.
Embed your form:
After you've customised your form, you'll need to embed it on your website. HubSpot forms can be embedded on your WordPress website using the Gutenberg editor, theme editor or HubSpot's WordPress plugin. You can also Embed your form on your HubSpot CMS website or create a landing page for it. Make sure the form is prominently displayed and easy for visitors to find.
Send follow-up emails:
Finally, you can send follow-up emails to your leads. This helps you stay in touch with your leads and build relationships.
By following these steps, you can use HubSpot forms to generate more leads for your business.
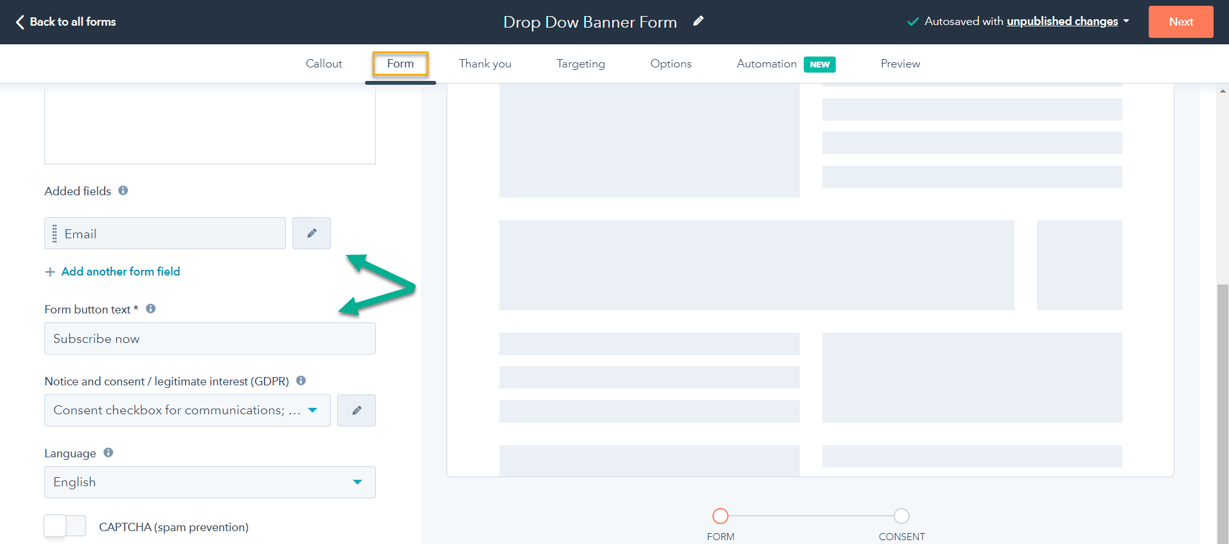
Create a form by going through the new form wizard. Next you'll see that the Email field is already included, and marked as mandatory in the form.
This is because an email address represents the minimum information required to collect about a contact. HubSpot, being primarily an inbound platform focused on content marketing, utilises email as the unique identifier for contacts.
All available fields are on the left-hand side, while the selected fields for the form are on the right.
Suppose we're creating a event registration form for a Linkedin Ads campaign to generate an attendee list The initial consideration is identifying the minimum information necessary for a contact registering for the event. Alongside email, you might want to include first name and last name fields. You may also consider adding a company name field, or other essential data fields.
To add a field to the right side, follow these steps:
To incorporate text into your form, such as a header, select the "Header Text" option. The text will then be positioned at the top of the form, and you can customise it by clicking on the placeholder text. Once you've edited the text, click "Done," and the updated text will appear at the top of the form.
Another benefit of using HubSpot's forms tool is that it integrates seamlessly with the rest of the HubSpot platform. This means that you can easily track and manage your leads in one central location. With the forms tool, you can automatically route new leads to the appropriate sales rep, add leads to lists for nurturing, and set up notifications to alert you when a new lead comes in.
If you're looking for a way to generate more leads, you should consider using HubSpot forms. HubSpot offers many features such as automated emails, drip campaigns etc which could help increase sales
When creating your forms, keep the following tips in mind:
1. Keep it simple:
Don't ask for too much information upfront. The goal is to get the lead's contact information so you can follow up with them later.
2. Use an attention-grabbing headline:
Your headline should be something that will make the lead want to learn more about your product or service.
3. Use Strong Calls to Action:
Your call to action should be something that will motivate the lead to fill out your form.
4. Have a strong Offer:
In order to get the lead's contact information, you need to offer something of value in exchange. This could be a white paper, e-book, or discount.
5. Follow-up:
Once you have the lead's contact information, be sure to follow up with them. This will help you build a relationship and eventually close the sale.
6. Use progressive profiling:
Progressive profiling allows you to collect additional information about a prospect over time, rather than asking for everything at once. This can help increase the conversion rate of your forms.
7. Use social proof:
Social proof is the idea that people are more likely to take action if they see others doing it. Consider adding social proof to your forms, such as customer testimonials or the number of people who have already signed up.
8. Use form analytics:
Use form analytics to track the performance of your forms and identify areas for improvement. You can use tools like Google Analytics or HubSpot Forms Analytics to track metrics such as conversion rate, the average time to submission, and the number of form submissions.
By following these tips, you can improve the effectiveness of your forms and capture more leads for your business.
The funnel refers to the different stages of the customer journey, from awareness to consideration to decision. By creating forms that are tailored to each stage of the funnel, you can more effectively capture leads and guide them through the conversion process
By designing your HubSpot Forms for different stages of the buyer funnel, you can more effectively capture leads and guide them through the conversion process. Presenting assets through forms tailored to each stage of the buyer journey, you can effectively nurture your leads through to a purchase decision, improving conversion rates and enhancing customer satisfaction.
Providing the right assets to site visitors at different stages of the buyer journey is crucial for guiding them smoothly towards making a purchase. The buyer's journey typically consists of three key stages: Awareness, Consideration, and Decision. Here's a breakdown of suitable assets for each stage:.
Awareness Stage:
At this stage, potential customers are just beginning to realize they have a problem or need, but they may not yet fully understand it. The goal here is to educate and inform them. At the awareness stage, prospective buyers are just learning about the problem or oppertuniy. As site visitors, they know very little about your business and your products or services. To capture leads at this stage, use forms to offer valuable resources, such as eBooks or whitepapers, in exchange for contact information. Make sure to not have too many fields - but do at least capture a first name with an email.
Assets to provide:
Decision Stage:
At this final stage, potential customers are ready to make a purchase decision. They need final reassurances that your solution is the right choice.
Assets to provide:
Non-HubSpot forms are HTML forms on your external site that weren't created in HubSpot. When you install the HubSpot tracking code on your external page submissions to non-HubSpot forms will still be collected in HubSpot.
For example, if you're using WordPress, you can still use forms on your website by installing a WordPress plugin like Gravity Forms or Contact Form 7. These plugins will allow you to create and manage forms from your WordPress dashboard by using the HubSpot for WordPress Plugin.
We dont recommend this option, and instead advise that HubSpot's own form is placed on your website- but the former does work in most cases.
When choosing a 3rd party contact form tool, be sure to consider the following:
Ease of use:
The tool should be easy to use and allow you to create forms quickly.
Features:
The tool should have all of the features you need, such as the ability to embed forms on your website, add custom branding, etc.
Pricing:
The tool should be affordable and offer a free trial so you can test it out before committing to a paid plan.
Support:
The plugin should have good customer support in case you have any questions or need help.
Once you've selected a form tool, you can follow the instructions to install and activate it on your WordPress website. After that, you can create forms using the plugin's interface.
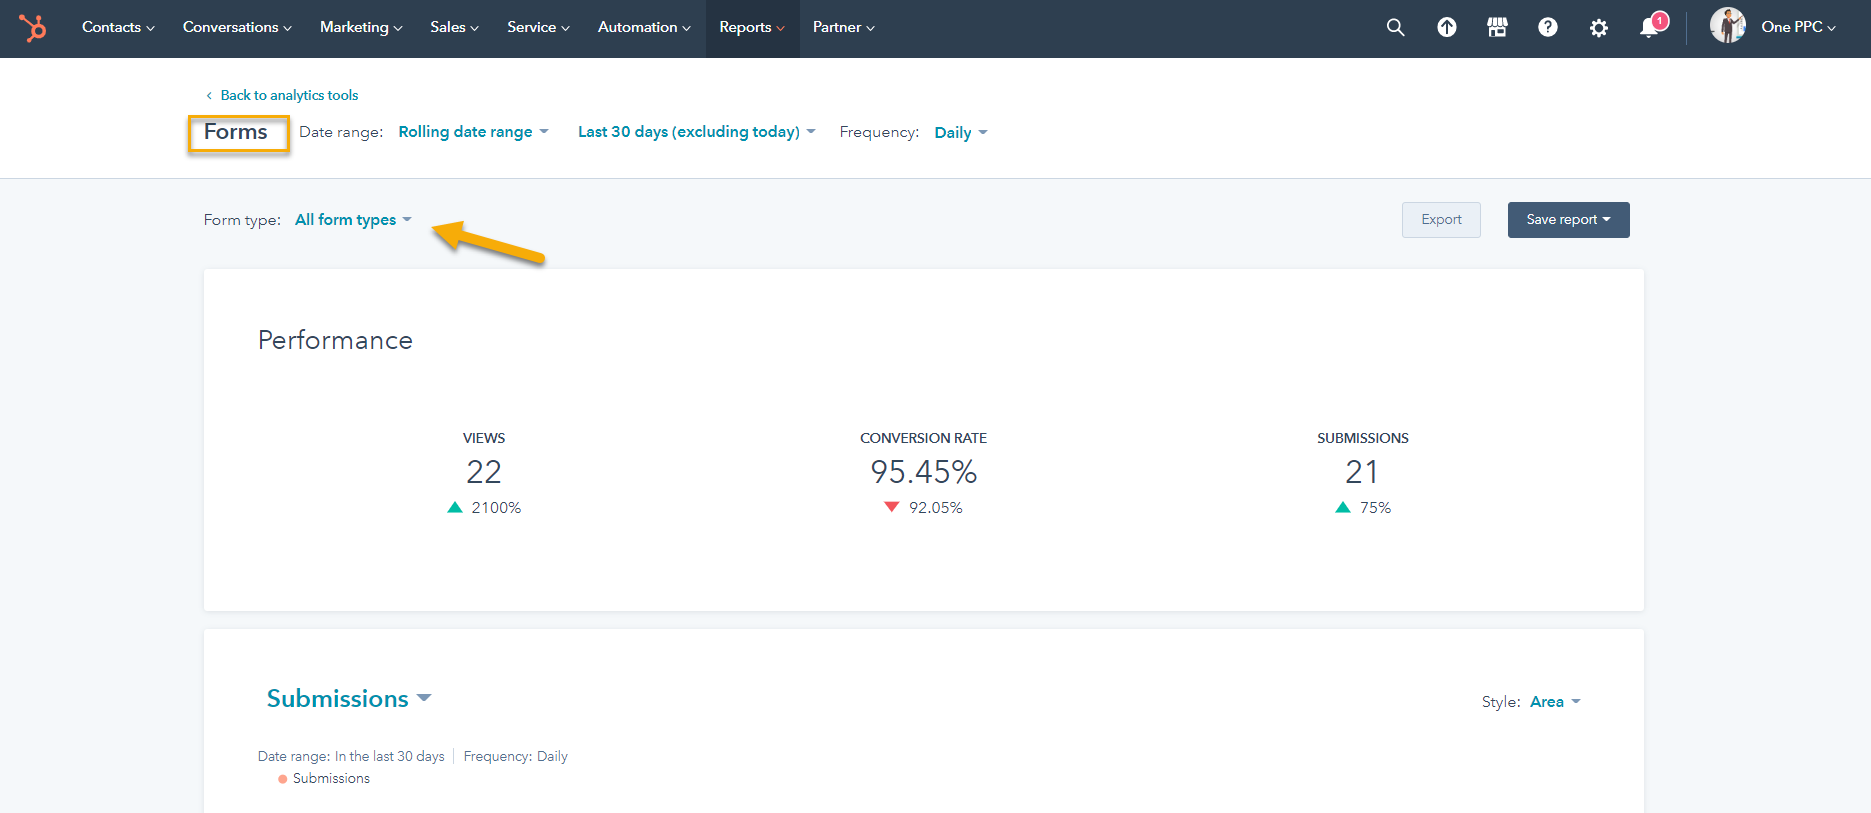
Once a form is published and active, you can track and analyse your results to see how well it's performing. To do this, go to the "Analyse" tab in HubSpot and select "Forms."
Here, you'll be able to see how many times your form has been viewed, how many have started filling it out, and how many have submitted it. You can also see which fields are getting the most responses and which ones are being left blank. This information can help you optimise your form so you can get more leads. You can use this information to improve your forms and get more leads.
To access the Forms Analytics tool:
By analysing your forms in HubSpot, you can get a better understanding of how your forms are performing and make any necessary changes to improve their effectiveness.
In conclusion, the strategic implementation of HubSpot forms within your digital marketing arsenal can significantly transform your lead generation and conversion processes. By offering unparalleled customisation, seamless integration with the HubSpot CRM, and features designed to optimise lead capture and nurturing, HubSpot forms stand as a testament to the platform's understanding of the intricacies involved in the digital marketing landscape.
As we've navigated through the multifaceted capabilities of HubSpot forms—from their diverse types designed for specific marketing objectives to the detailed customisation options that align with your brand identity—it's clear that these tools are crafted to enhance your marketing strategies effectively. The integration of advanced features such as progressive profiling, automated follow-up emails, and GDPR compliance further underscores the platform's commitment to delivering a sophisticated yet user-friendly experience.
The power of HubSpot forms lies in their ability to not only capture leads but also to enrich the quality of these leads through detailed insights, thus enabling a more targeted and personalised approach to lead nurturing. Whether it's through embedded forms that blend seamlessly with your site's aesthetic, pop-up forms that capture attention at critical moments, or standalone forms that simplify the data collection process, HubSpot provides a solution tailored to meet your unique business needs.
Moreover, the ease of use, coupled with the analytical tools available within HubSpot, allows businesses to continually refine their strategies based on actionable data, ensuring that your lead generation efforts are not just effective but also efficient. By harnessing the full potential of HubSpot forms, businesses can look forward to not just an increase in the quantity of leads but also improvements in the quality of these leads, ultimately driving growth and success in today's competitive digital landscape.
As we move forward in an era where digital presence is synonymous with business success, leveraging the capabilities of HubSpot forms becomes not just an option but a necessity. The journey towards optimizing your lead generation and conversion strategies begins with a single step: embracing the power of HubSpot forms to transform prospects into valuable customers. Embrace this journey, and watch as your business reaches new heights of digital marketing excellence.
If you want to learn more about HubSpot Marketing, see our guide to HubSpot Marketing Hub
HubSpot’s Reporting feature gives you valuable insights into your website’s traffic, leads, and customers. With this data, you can make informed...
A landing page is a specific web page that is designed for lead generation and conversion. They can be tested against website pages or other landing...
HubSpot Landing Pages: A-Z Guide on using HubSpot Landing pages to get a better ROI for your company.